

Upgrades Page
I must mention John Healy and Don Hutchinson the USA Triumph Experts who assisted me with additional information.
Engine Improvements
Generally the engine is reliable without modification as long as the state of the components such as the main bearings and sludge trap within the crankshaft is known. Weak points are Timing side oil feed on pre 1969 machines which, can be resolved by a period “Devimead” conversion. Dynamic balancing can smooth the crankshaft vibration inherent to parallel twins but with these smaller twins the benefit is marginal.
Apart from the very first T21’s all models share the same crankshaft until 1968 when this is changed across the range. All 350 cc engines until 1968 feature steel con rods while 500 cc machines all have RR.56 Hiduminium alloy rods. Refer to the General Data pages in the Works Manual for dimensions.
If replacing only one half of the crankcase try to select a replacement from the same year to minimise problems.
For Maximum performance look for the December 1967 Motor Cycle Mechanics as this details a Race Prepared Tiger 90 and the work done. (8500 rpm and 120 MPH) and refer to articles covering the work undertaken on the Daytona Race Machines by Doug Hele.
Converting…
3TA and T90 engines to 500cc to improve performance may initially seem relatively easy but involves replacing the pistons, con-rods, barrels, heads, carb and sometimes exhausts. For the 3TA you should first consider fitting sports camshafts, high compression pistons and T90 cylinder heads to improve the performance.
Triumph service bulletin no: 240 gives comprehensive details and parts suitable for converting the 3TA and Tiger 90 to High Performance Specification. Contact the VMCC for a copy.
It is viable for all models to fit lower or higher compression pistons from other machines in the range. Please note there are; many variations of cylinder head/valves/camshafts/gearing and only the correct combinations will improve overall performance. Almost all the camshafts all feature three keys to allow some variation in valve timing but this work should be carried out with care.
Barrels in original sizes are becoming rare, together with standard pistons. An option is to have the barrels sleeved to standard and then bored to suit the pistons available. Unfortunately this will often double the cost !
All early models will benefit from replacing the distributor with one of the compact ignition units from Electrexworld, this replaces the Lucas Alternator with an efficient and compact energy transfer unit with additional capacity to provide basic lighting. The unit I have seen is well made and would readily fit any C range model to give an extremely simple and reliable system, especially suited for competition or occasional use machines. www.electrexworld.co.uk
Models fitted with the distributor can be converted to the points in the Timing cover if all the suitable components are obtained. Technical Bulletin 13 details this along with other factory approved modifications.
Lead Free …
Most Classic machines do so few miles that a lead free conversion is not required. You may need to invest in a conversion if you are intending to use the bike regularly, for long distances or for Competition on standard gas. Models with high compression Pistons benefit from high-octane fuel and so some octane booster added to unleaded petrol does improve performance.
Oil & Filtration…
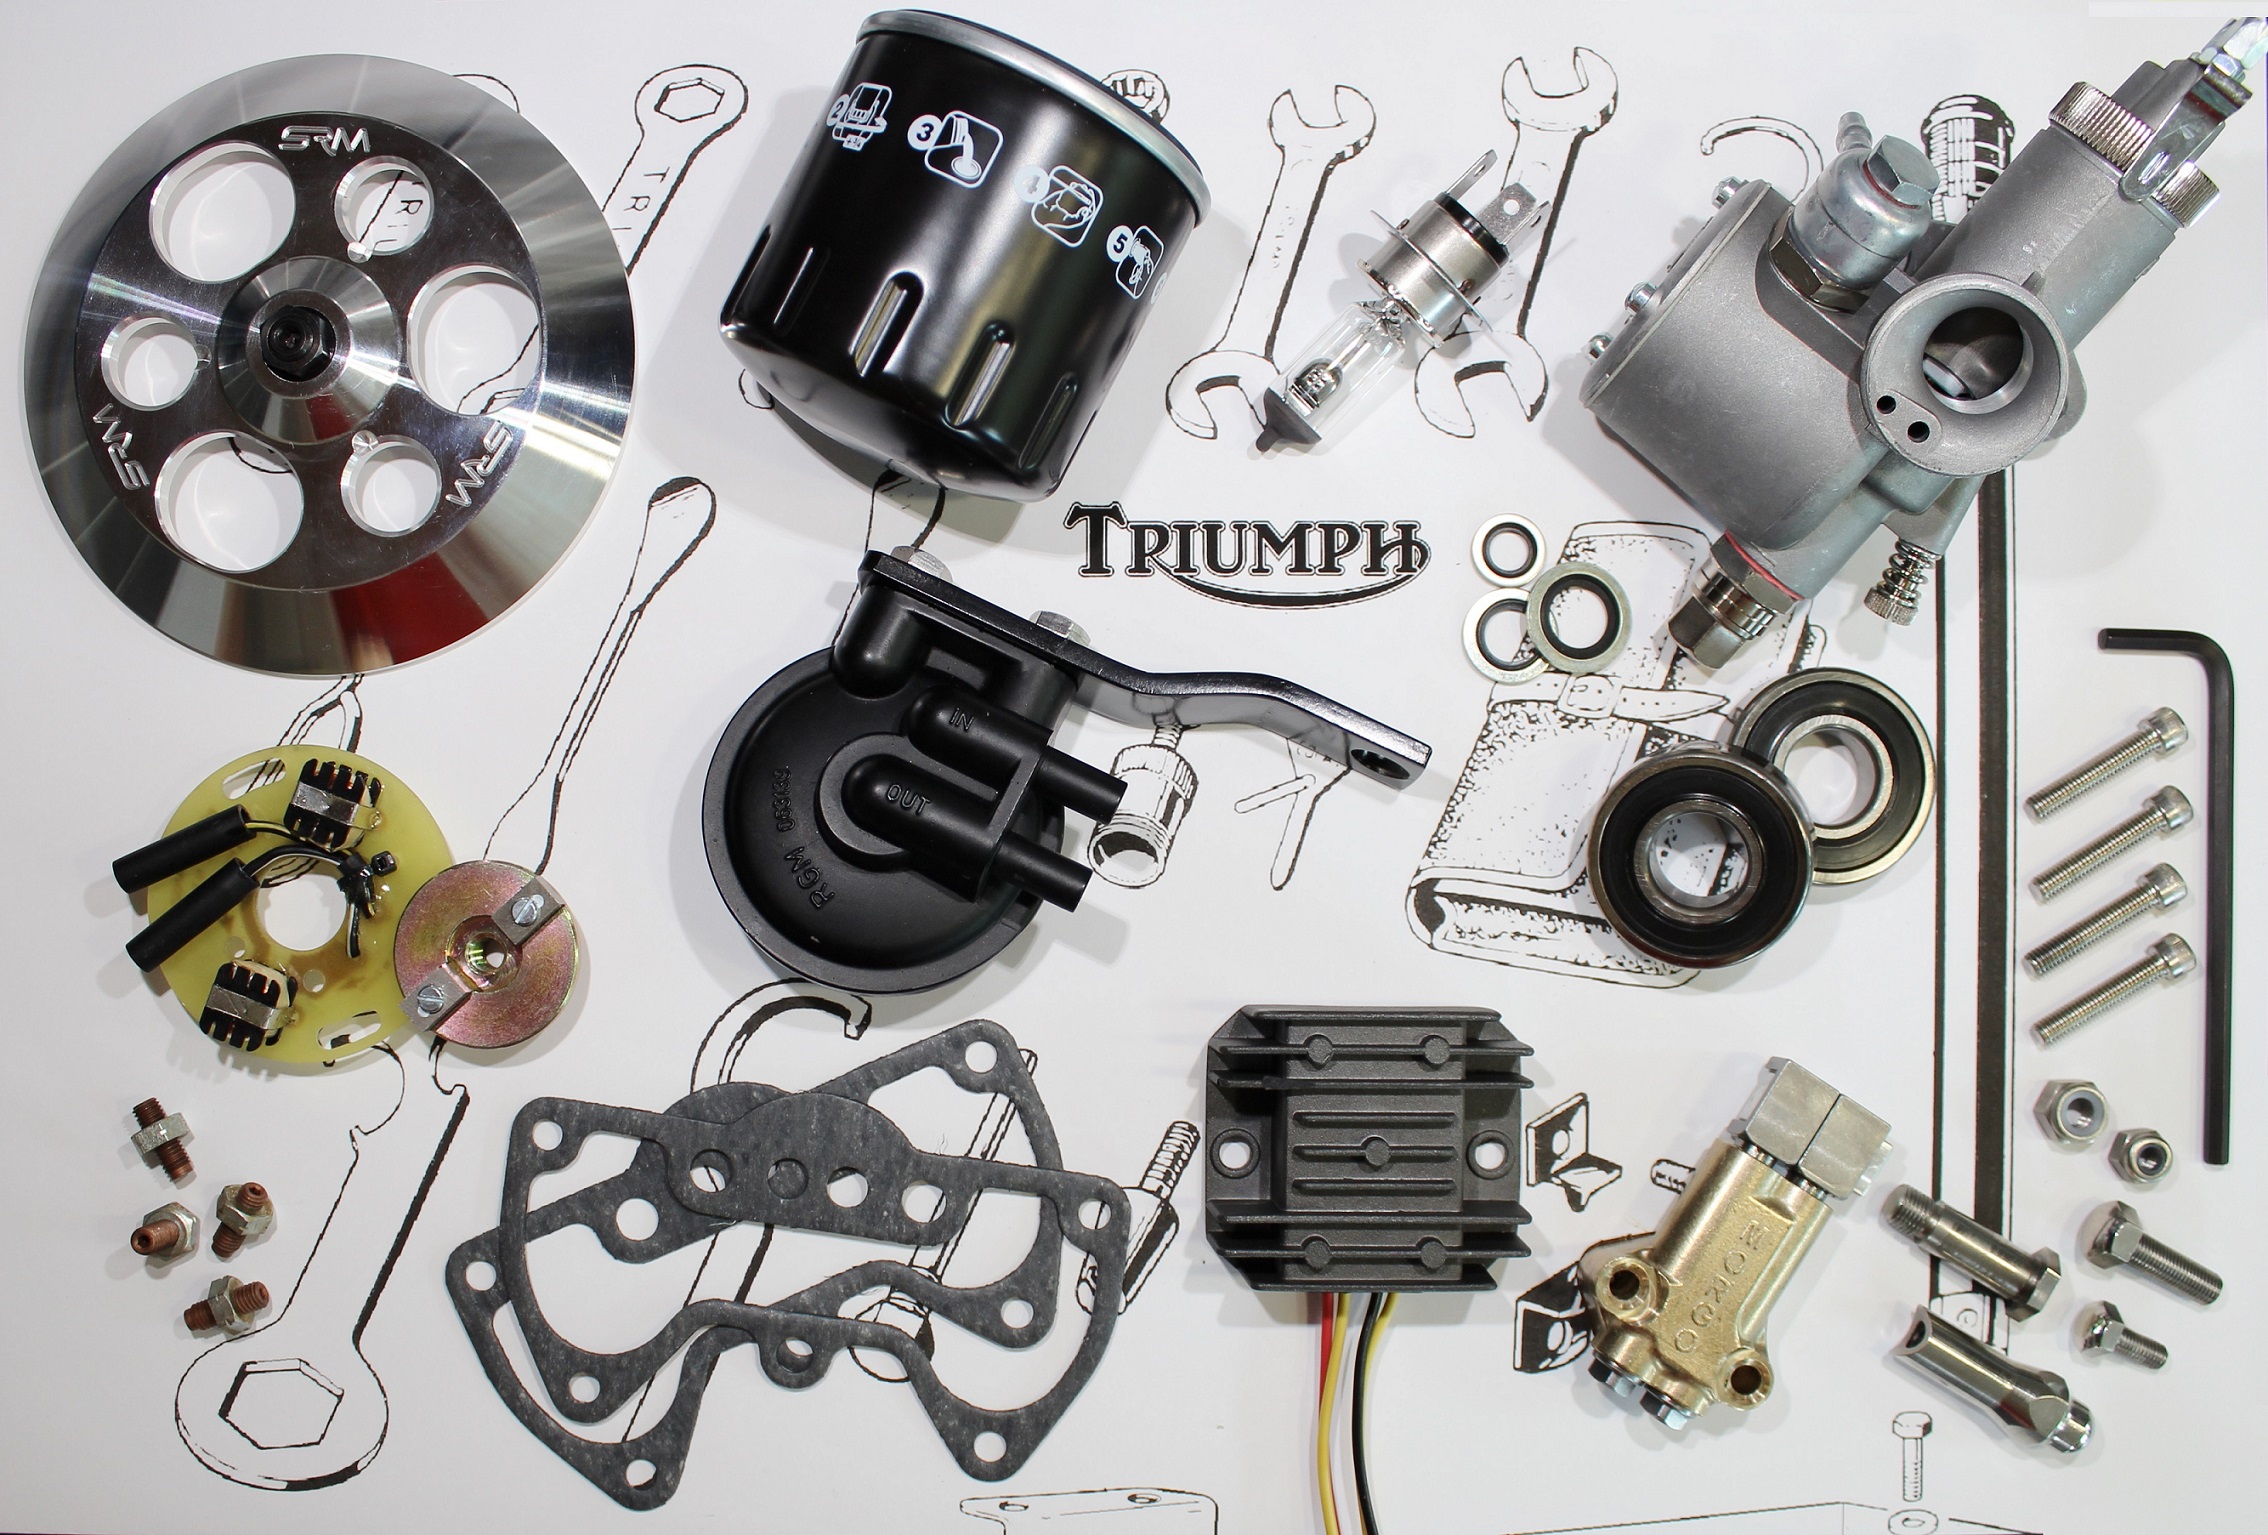
The standard filtration system relies on wire gauzes in both the sump and oil tank, together with the action of the centrifugal sludge trap in the crankshaft. A modern cartridge type filter will greatly improve filtration; increase oil capacity and oil cooling. Several suppliers do a filter kit; this with a simple bracket (see photo above) can be fitted neatly under the gearbox attached to the frame by the right footrest bolt. The filter supplied with the kit is compact and the conversion is discrete.
For High Performance engines improving oil cooling should be investigated, this could be done by fitting a small oil cooler across under the engine. Post 66 machines have a greater oil tank capacity and fitting a later tank will not detract from the overall appearance.
The Morgo big bore oil pump (shown above) is a direct replacement for the Triumph unit; this is easily fitted once the timing cover has been removed.
The Oil feed to the rockers can be improved by enlarging the centre hole of the rocker shaft so that the flow is not restricted to the ends (beware this is hardened and a pig to drill). Also be aware that over tightening the oil pipe domed nuts can crush the upper copper washer against the bolt therefore restricting flow. Ease the inside of washer with a triangular file. Access to the bolts becomes restricted once the head steady’s are located; locktite is advised.
Tappets.
Allen-key tappets (shown above) are usually available, these ease tappet adjustment. You may need to remove the rocker boxes to fit these. I have found the light alloy nuts strip easily, but can be replaced without removing the rocker boxes. The Tappet Covers are easily lost, ensure that the retaining clip (fitted from 1963) is actually in contact with the cap and indenting the serrations, examine the cap edge and file carefully to suit.
Late model post 68 rockers can be replaced with the better earlier rockers where oil is directed to the tappets through drillings rather than relying on splash lubrication. Later (1970) rocker spindles have an oil scroll and are suitable for use with the later rockers.
If you are going to use the 1968 parts it is recommended to file (deeper) the oil path indentation on the end and to use an additional thin washer between the rocker and the Thackery washer so that the Oil is directed towards the tappets/valves where it is needed.
Push Rods…
For performance engines it is recommended to fit larger diameter pushrods, I know this sounds contrary to the usual principle of lightening parts but the standard rod has a tendency to flex preventing the valves opening fully on lift. Standard rods can be lightened by carefully machining the lower end of the Cup.
Images of the Factory Daytona engines show Hollow Rods and lightened Cam Followers! Refer to the excellent article and drawing in Motor Cycle 11th May 1967
Daytona Race Machines also feature larger Cam Followers that affect the rate of valve opening but not the Valve Timing.
For maximum engine performance it is vital to Time the Camshafts Correctly using a degree disc.
Rocker Box Gaskets…
Metal backed gaskets (shown above) for the rocker boxes are available which do not compress like the standard paper versions, it is not recommended to eliminate the gasket as this may lead to the tappet adjustment being reduced or eliminated in addition to the angle of tappets to the valves changing beyond the design limit.
The gaskets shown ease replacement of the rocker boxes as they readily guide the pushrods into place but ensure the hole for the pushrods in each gasket is large enough to prevent the rods rubbing, if needed elongate the holes slightly with a suitable wad punch!
Clutch …
The clutch fitted to the ‘C’ range is under stressed and reliable if unworn, several changes were made over the years and so clutch hubs, main shafts, operating rods, spring cups, springs and pins may not be compatible. The Clutch benefits from careful assembly and the rigid cast domed plate from SRM (shown above) is excellent. Clutch problems are usually the result of wear within the shock absorber and the engagement slots on the clutch hub and basket. Additional problems stem from wear in the release mechanism. Once wear has occurred very little can be done. Replacement is the only solution.
Belt drive clutches are available for most Triumph models and should be considered on cost if your clutch requires replacing.
Gearing …
The majority of machines were supplied with standard ratio gearboxes, some competition models feature either high or low ratio gearboxes depending on their market, these are marked either CR for Close Ratio or WR for Wide Ratio and contain components to suit. I have seen Triumph Bulletins which detail the supplied ratios and alternate parts available for each model year. Contact the VMCC for a copy.
In 1969 Triumph manufactured a small batch of five speed gearboxes for homologation purposes for the Daytona Races, you will be very lucky if you come across one of these.
It is possible to increase the gearing by fitting a larger gearbox sprocket but at some loss of acceleration, Ideally you should increase by two teeth to avoid using a chain with a cranked link. This will mean the gearing will increase by 12%, which will be too high for the smaller engines in standard tune. The post 66 bikes have the removable rear sprocket, which could be increased in size (it’s too small to decrease the size without the chain fouling the fastenings). Combined with a larger gearbox sprocket this would to give a smaller leap in overall gearing. I have found the standard gearing excellent for general use with only prolonged high speeds exposing the low top gear. Alternative gear ratios were supplied in standard, close or wide ratios but the top gear ratio in the gearbox is the same.
Early 3 and 5TA’s feature plain bushes on the layshaft, consider replacing these with the needle roller bearings as fitted to the Tiger 90 and Tiger 100. You will need to replace the kickstart spindle as the bushed version will not accept the needle roller bearing without machining.
Note… Gaining access to the gearbox sprocket involves dismantling the clutch. Six small screws often punched and sometimes requiring drilling retain the access plate and its gasket. Special tools are needed for removing the clutch hub and the gearbox sprocket, making this a less than simple job. You will need to renew the screws, gasket, gearbox nut, its lock washer and the oil seal in the access plate.
The clutch removal tool D662/3 is readily available from your parts supplier and a 38mm ½ inch drive, deep impact socket will deal with the sprocket nut.
Improving Electrics
Pre 1966 C Range Triumphs will benefit from changing to a 12 Volt System. This can be achieved in several ways.
Either by using the 1966 or later wiring scheme, fitting the Zener diode in a suitable location. A heat sink hidden behind the left hand panel neatly re-creates the 1966 location. The later Finned Zener heat sink is effective it is also highly visible in its location between the forks. For both you can replace the Lucas plate rectifier with a modern encapsulated unit. Ideally you can retain the original rectifier for show using dummy wiring to complete the deception.
The excellent Boyer Bransden Power Box or alternative unit (shown above) can be fitted; there is sufficient space on the back of the battery carrier for this to fit. I have had great success using the Boyer power box without a battery but it only really suitable for a machine used solely during daylight. With a power box it is possible to simplify the wiring, eliminating the ammeter, fuse, ignition switch, Rectifier and Zener, though you will need to arrange an ignition kill switch. If re-wiring later machines consider dummy wiring the Zener diode and other components to retain the appearance of originality.
A more recent development has been the introduction of a new ignition and lighting (Rotor/Stator) kit from www.electrexworld.co.uk. Extremely compact and well made this is an advance on the Boyer Bransden system and would further simplify the ignition and lighting circuitry, where the Boyer Ignition is only suitable for the post 62 points models the Electrexworld kit will fit all models in the range and replaces the distributor, though this could be retained for display purposes. All in all probably the best modern solution especially for machines used only occasionally.
When re-wiring I recommend using modern 2mm cable and running dedicated earth wires to the headlamp, tail lamp, engine and coils. Carefully crimped, soldered and finished with a little heat shrink tubing the standard British bullet connector is reliable, especially if filled with Vaseline or silicone grease before pressing together, the correct tool is essential. Try to keep to the wiring colours used in the appropriate diagram for the year, as this will help you to trace problems you or the next owner may have later. Generally there is a wiring convention for British Machines and you will soon learn the primary colours.
All connections will eventually become loose either due to corrosion, heat or metal fatigue, to minimise these failures plan the wiring carefully to reduce the number of connections to an absolute minimum and arrange the wiring to avoid hot spots and excessive flexing. Think of replacing the bullet connectors after ten years and re-wiring after 20 years.
Pay attention to giving wires additional support or insulation where movement and abrasion occurs, the wiring to the coils can short out on the sharp edges of petrol tank over time. If you are not so concerned with originality I recommend covering exposed areas of the loom with additional material.
Any change to 12 Volts will need the Bulbs and Horn replaced. On no account feed the Lucas 6V 8H horn with 12 Volts as this will destroy it, with care and time a non working horn can be dismantled, serviced and revived, Retain the horn with dummy wiring and place a modern version out of sight under the tank.
Alternator.
The Lucas RM19; 3 wire alternator and the wiring scheme are not able to provide sufficient charge when running with the dip beam on continually; as is required by European Legislation, up rated single phase alternators are available to improve the situation, an excellent solution when combined with the power box. For long daylight runs alternate between running with the lights on and then off in order to let the Zener and battery rest. Monitor the ammeter to judge current flow.
Lighting.
Improving the lighting is possible by fitting a halogen or LED conversion and LED instrument and tail light bulbs. Up rated pilot bulbs (21 watts) are also available. If touring where daytime lights are mandatory I find the 21 watt Pilot a good option as the bulb is small and easy to carry a spare of.
I have also had success with the Neolite headlamp unit supplied by Hitchcocks, this has an excellent beam pattern and intense light provided by the modern Phillips bulb.
Electronic Ignition.
Today there are several solutions available, recent advances in electronics by Electrexworld have made it possible to combine the ignition and lighting units to produce a very compact and neat solution. Their unit replaces the Lucas Alternator and Rotor with a new unit that provides both Sparks and additional power for lighting. It has the advantage of replacing Distributors, Points and Coils making for extremely simple and attractive solution for all models contact Electrexworld at www.electrexworld.co.uk
Fitting the excellent Boyer Bransden Electronic Ignition (parts shown above). You should already have changed to 12 Volts to get the best from the system and fitting will be easier if you undertake the two jobs at the same time. The control box fits neatly under the tank between the frame tubes, secured with a large cable tie or tape. The connections to the coils can then be kept short while the location keeps the box and connections dry allowing some cooling air to reach the unit. Setting up the ignition can be time consuming but once done is set for life. I use a little smear of silicone on the adjustable plate to fix the location and loctite on the taper and thread of the magnet holder. Problems with movement of the magnet plate are usually the result of a poor interference fit with the exhaust camshaft.
I have found the crimp on bullets supplied with the Boyer ignition kit are distorted by heat and recommend changing these to spade, British bullet or Japanese connectors, soldered in place and carefully insulated. With care it is possible to re-solder the wiring directly to the PCB. Smear silicone on the cover plate flange and fill the wiring entry point to weatherproof everything.
The only fault I have experienced with the Boyer is the unit WILL fail if the battery becomes disconnected or the Zener fails allowing the voltage to rise to exceed the maximum. Regularly check these connections. If the engine stops after a short period of erratic running, the main fuse and ignition box connections are the first things to check. Misfiring at high revs is usually the result of a flat battery. Fitting the power box described above is the best solution.
There is sufficient space within the headlamp shell to carry a complete spare ignition unit.
Handling
Suspension …
Dual or Variable rate fork springs are available or could be made for you by a spring specialist The grade of oil used in the standard pre 68 forks has little effect with no shuttle damping, though Triumph do recommend experimenting with grades. Do not exceed the recommended quantity. The oil has a dual role of lubrication and as a hydraulic stop. It is possible to fit to post 64 machines the shuttle damping fitted as standard on the later machines. The works manual details this modification.
I have data for an alternative spring rate from Tri-Cor Bulletin 65/3 detailing a spring with 17 coils instead of 13.
It is not necessary to have the special fork assembly tool, I use a suitably sized jubilee clip to grip the stancion while compressing the spring and then fit the complete unit. The Jubilee clip can then be removed allowing the spring to extend to its normal position. A suitable ‘C’ spanner tool is required to remove tighten the chromed oil seal spring/holder. A workable clamp can be made using a block of wood and a suitable sized hole saw.
Fork Judder if present will be caused by worn sintered bronze bushes, replace these as a matter of course.
The rear shocks were factory fitted with 145lb Springs, these are suitable for pillion passengers, changing to 90lb Springs as indicated in the Performance Bulletin will improve the handling for solo riding/racing.
Frame …
The pre 67 C Range Frame has several issues, all early bikes benefit from the 65 frame brace and tank if these can be sourced, or welding in a brace as in 1966, all the bikes up to 67 have a tendency to shimmy when cornering especially when not on the throttle. This is because of the lack of support for the swing arm. I have seen two early machines modified to the 67 swing arm arrangement by having additional plates welded to the frame with later swing arm parts. This is a serious conversion which will be difficult to do well and difficult to undo later. Please don’t do this if the bike is in good condition buy a post 1968 bike instead where it’s all been sorted for you.
Tyres …
Unfortunately there is little Tyre choice in the 18 inch size (3.25 – 3.5) I have happily used Dunlop K82’s for several years. Replace any Tyre you suspect to be over 10 years old or obviously cracked, your life is at stake! Always assess the rim for corrosion inside, check the spoke locations before fitting a new tyre and use a new tape. Discard any tube that has been repaired. I have found Michelin tubes if available hold their air better than other makes. The factory recommended carefully balancing wheels for high-speed work.
Bearings …
Sealed bearings (shown above) are usually available to replace the open wheel bearings, A good bearing supplier will be able to advise if you can provide a sample. It is a good idea to have suitable drifts made to drive the bearings in squarely and without damage. Put the bearings in the freezer overnight and heat the hub with a hot air gun to ease fitting. Bearing Locktite is a good idea if you suspect there has been a problem.
Brakes
Early ‘C’ Range machines can be fitted with the fully floating brake shoes, part numbers W1406 and W1407. Look carefully at the floating shoe slipper as this often becomes indented and ineffective. A common modification is to fit the twin leading shoe brake from the later bikes, this will greatly improve performance but at the loss of originality. It should be possible to modify the standard plate to twin leading design internally as there is room within the hub. This could be done on a spare plate and its components without committing.
The standard brake is quite adequate for normal classic use if serviced and set up properly. Have the drum skimmed, the linings replaced with modern compound and then machined to fit. Ensure the linings are chamfered on the leading and trailing edges. Check the springs are in good condition and that the surface of the drum is not contaminated with grease or oil. Clean with brake cleaner (isopropanol) or Acetone.
After correct assembly (refer to the manual), loosen the fixed anchor point and the spindle nut, apply the brake hard and while maintaining pressure tighten the spindle nut and then the anchor. This procedure will position the shoes at the optimum position. The hole in the brake plate for the fulcrum can be carefully elongated with a file to increase the amount of adjustment available. This mod was done by Johnny Giles to improve the brake performance on his ISDT machine.
Try to ensure the operating arm is at right angles to the cable when the brake is applied and the handlebar lever is not flexing on the bar.
This will all help to maximise the performance of the standard unit, but even I admit that at speeds above 60 mph it can get a bit exciting !
Carbs
New replacement units in both monoblock (shown above) and concentric styles are available from various sources. Plunger choke versions are available by request. Better still is to renew the jets and internals of the original carb. Look up the manual to find the size and jet requirements you need. Please don’t throw the original carb away as these are very difficult to find. Clean it and pack it away in an air-tight container. Worn units can be re-sleeved and reconditioned to keep the authentic parts going.